Compost Info Guide
Compost Tips, Composting Aritcles, Compost Bin reviews and much more...
Composting Articles:
Worm Compost: A Beginner's Guide to making great compost with worms
Worm composting, also known as vermicomposting, is the process of transforming organic waste using worms to create fine black granular compost known as worm castings or worm compost. Rich in phosphorus, nitrogen, and other nutrients and trace minerals, worm compost is a great source of slow-release nutrients for your plants or lawn and is an excellent all round organic fertilizer and soil conditioner. Worm composting is a very convenient way of composting for apartment dwellers and anyone else who would have difficulty maintaining an outdoor compost pile. Here's how to get started:
The Worm Composting Bin
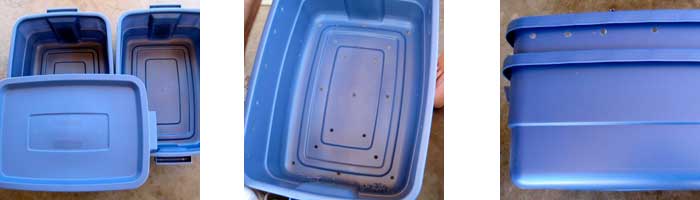
Worms are photophobic, which means that they don't like bright light, so be sure to use an opaque dark coloured bin. You can either build your own bin using something like a Rubbermaid storage bin, or buy a ready made worm composter. Here's where to buy a worm composter. Plastic bins with tight fitting lids are ideal for worm composting. The size of your bin will depend on how much food you will be adding. A bin should have about one square foot of surface area for each ½ kilogram (1 pound) of food added each week. Here's a handy chart to help you determine the right size of bin for your needs:
Choose the right size of worm bin for your needs
| NUMBER OF PEOPLE | WORMS | BIN SIZE |
| 1 TO 2 | 1 pound | 2' x 2' x 1' |
| 2 TO 3 | 2 pounds | 2.5' x 2' x 1' |
| 4 TO 6 | 3-4 pounds | 3' x 2' x 1' |
A worm bin should have drainage holes on the bottom and air ventilation holes on the top and sides. If you are making your own bin, drill 8 to 12 holes (using a 1/8 or 1/4 drill bit) in the bottom of the container for drainage. Drill 7-10 holes in each side and in the lid of the container for aeration. Raise the bin on bricks or wooden blocks, and place a tray underneath to capture any excess liquid which can be diluted and used as liquid plant fertilizer. Place a tray underneath the bin to catch any excess liquid or you can insert your worm bin into a second bin that has a few bricks in the bottom to elevate the top bin.
The Bedding
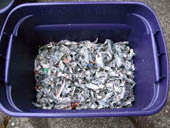
Fill the worm bin with strips of unbleached corrugated cardboard and lots of shredded newspaper. You can also add some straw, dry grass or shredded leaves. Try to vary the bedding as much as possible to provide more nutrients for the worms and to create richer compost. Add one or two handfuls of garden soil or sand to provide some grit which helps with the worm's digestion of food.
Moisten the bedding materials so that the overall moisture level is like a wrung-out sponge. The bin should be about three-quarters full of the moistened bedding. Fluff up the bedding gently to create air spaces so that it feels light and airy.
Sprinkle a handful or two of garden soil on top, and thoroughly moisten. Allow the moisture to soak in for at least a day before adding worms.
Types of worms for composting
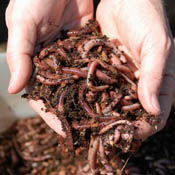
There a few varieties of worms that are suitable for worm composting. The worms most commonly used are red worms (Eisenia foetida) also known as red wigglers, brandling or manure worms. Here's where to buy red wiggler worms.
They are about 4 inches long, mainly red along the body with a yellow tail. Redworms generally live in organic matter which is in contact with the ground. You will find them in decomposing leaves and decaying plant matter, aged manure, and the cooler parts of a compost pile. Another variety to consider are European Night crawlers (Eisenia hortensis). While it is possible to harvest red worms from your own compost pile beginners should start by purchasing worms to ensure good results. Do not use regular earthworms or the "dew worms" found in the your garden soil and those that emerge after a rainfall - they will not survive in a worm compost bin.
Feeding the worms
Worms should be fed every few days. Cutting up the food scraps will hasten the composting process. Although the worms will eat food scraps of any size, chopping them by hand or in a food processor allows the worms to digest them more quickly. Bury the kitchen scraps in a different area of the bedding each time at least an inch or two below the surface of the bedding. You can feed them any vegetable scraps including fruit and vegetables, crushed egg shells, bread, tea bags and coffee grounds but be careful not to feed them too much citrus fruits so as to maintain the right pH balance in the bin. It is also a good idea to avoid adding meats, dairy, oily foods and grains. The food scraps should disappear in a week or two. If the volume of bedding reduces very quickly you can add more as needed.
Locating your worm bin
Worm compost bins are most commonly used indoors but they can also be located outdoors during the milder seasons or in areas that are mild all year round. Many people keep a bin in the kitchen if they have the room and basements are excellent locations but any space can be used. Outdoors, worm bins can be located in garages or sheds, on patios or in the yard. Outdoor bins should also be kept in the shade.
Harvesting the finished worm compost
A few months after a new worm compost bin has been started little of the original bedding will remain and it will be time to harvest your worm compost. In order to harvest you need to separate the worms from the finished compost.
The simplest way to separate the worms is to move the finished compost over to one side of the bin and fill up the other side with new bedding and fresh food for the worms. The worms will slowly migrate to the other side of the bin in search of fresh food. The remaining compost can be removed all at once or can be skimmed off as you are ready to use it. If you see any cocoons in the compost move these over by hand to the side with the new bedding. These are worm cocoons from which new worms will hatch. Once you have removed all of the finished worm compost you can add a handful or two back into the fresh bedding and you're ready to start on a new batch!
An alternative way to remove the worms from the finished compost is to expose the contents of the bin to bright light. The worms will move away from the light, working their way down to the bottom of the bin. As they move downward you can skim off successive layers of compost until you are left with a layer that is mostly worms. Just add fresh bedding and you're ready to start a new batch.
Using your worm compost
There are many uses for worm compost, here are just a few:
- Worm compost can be mixed with potting soil for house plants or patio containers. Use one part worm compost to five parts potting soil.
- Add a little worm compost to the bottom of a planting hole when you are transplanting in the garden
- Add it at the bottom of a furrow when planting seeds
- Make worm compost tea or "worm castings tea" which is a great way to feed your plants. Fill a bucket with a gallon or two of water and mix in a few tablespoons of corn syrup or molasses. Try to use rain water or tap water that has sat for a few days (you don't want chlorine to kill the beneficial micro-organisms. Put a heavy stone and a few handfuls of worm compost in a stocking and tie it closed. Add the stocking to the bucket and let it steep for up to 24 hours. Give it a stir occasionally to get some oxygen into the mixture. Use your worm compost tea within a few days.
Recommended Reading: Worms Eat My Garbage: How to Set Up & Maintain a Worm Composting System
Common problems
The most common problem is a foul smell coming from the bin. This is caused by a lack of oxygen in the mixture due to too few air holes or from adding too much food to the bin. The simplest solution is to add less food for the worms and gently stir up the contents to get some air into the mixture. Add more ventilation holes if necessary.
The second most common problem is fruit flies. To prevent fruit flies always bury the food a few inches below the bedding material. Cut a piece of cardboard, soak it in water and fit it snugly on top of the bedding mixture. This makes it more difficult for fruit flies to lay their eggs in the bedding. Freezing the food scraps before adding them to the bin also helps. If fruit flies continue to be a problem you may be adding too much food to the bin. Reduce the volume of food and the flies should cease to be a problem.