Compost Info Guide: How to make better compost
Compost Tips, Composting Aritcles, Compost Bin reviews and much more...
Composting Articles:
10 Tips for Making Better Compost
Here are the top 10 ways we know of for making compost in less time and of better quality than ever before.
1. Get the Optimal Balance of Compost Materials
It's important to get the right mixture of ingredients in your compost to ensure that it heats up nicely and breaks down effectively.
Here's how:
Getting the right mixture of brown (carbon) materials, to green (nitrogeneous) materials will make a huge difference. Adding too much brown material will result in a compost pile that takes a long time to break down. Adding too much green material will result in a compost pile that is slimy and smelly that doesn't break down well. In order for your compost pile to break down quickly and efficiently you should feed it just the right balance of brown and green materials.
The microorganisms in our compost bins need both carbon and nitrogen to thrive; carbon for energy and nitrogen for protein synthesis. For every one unit of nitrogen used by the bacteria they also consume about 30 units of carbon. So in order to keep the bacteria working efficiently we need to supply them with a mixture that is about 30 parts carbon to 1 part nitrogen. Needless to say, most materials don't have a ratio of 30:1. However, if we know the approximate C:N ratio of the materials we use in our compost, we can combine them so that the total mix will be close to 30:1. It's really not that complicated...
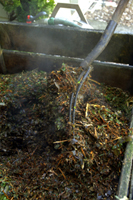
2. Turn the Compost More Often
Adding fresh oxygen into your compost pile by turning it more frequently will help your compost break down faster. Here's why:
Many of the bacteria that break down your compost need air to survive. A week or two after the pile is made these bacteria will start to die off as they start to use up the available air in the pile. This drop in the amount of bacteria will result in the compost pile cooling off a bit from it's peak temperature. When this happens it's time to turn the pile to get more air into it.
When turning your compost pile, move the drier material from the outer edges of the pile into the center and break up any clumps to get as much air into the mixture as you can. Moisten any of the materials as you go if they seem dry.
If you have the time, we suggest turning the pile every 14 days or so, or when you see the temperature fall from the next peak in termperature of about 110° - 120° F. That's more often than most of us have time for, but, in general, the more you turn the pile the faster you will have finished compost. If you're using a plastic compost bin, an aerator tool will make the job of turning much easier. A garden fork is often the best tool for turning compost in an open style bin.
Another way to get more air into your compost is to stick a stake or metal rod into the pile and wiggle it around to create an air pocket. Some people even drill holes along the length of PVC pipes and the pipes horizontally as they build their compost pile.
3. Check the Moisture Level of your Compost
Acheiving the correct moisture content is an important factor in keeping a compost pile working efficiently.
The key to getting the correct moisture in your compost is to moisten the pile without making it too wet and soggy. Many people recommend adding moisture until the material is as moist as a wrung out sponge. This is far too wet. If you can squeeze water out of it, it's definitely too wet. If your pile is too wet adding some dry brown materials such as chopped leaves or hay should help dry it out.
If you live in a very dry climate, make an indentation in the top of the pile to collect rainwater and help keep the pile moist. If you're in a rainy area cover the top of the pile with a tarp or other covering to keep it from becoming too wet.
A moisture content of between 50-60% is desirable in an active compost pile but how many of us know how to measure moisture?...
Learn how to measure the moisture content of compost »
4. Use the Berkeley Method of "fast composting"
A really fast method of composting known as the "Berkeley method" or "fast composting" produces finished compost in as little as 14 to 21 days.
Fast composting produces a higher quality compost in less time than traditional methods. The finished product contains a higher nutrient value becauase nutrients are not lost to leaching from rainfall and long-term exposure to the elements. The original Berkeley method involved the layering of carbon and nitrogen materials but today, many composters mix all the materials together into one large fast compost pile.
The jury is out on which of these options helps the pile to heat up faster. Choose whichever option you feel most comfortable with. For the purposes of this article we will mix all of the material together...
5. Shred Some of the Ingredients - Especially the Brown Material

If there is one secret to making compost faster, it is finely shredding the carbon rich ingredients such as leaves, hay, straw, paper and cardboard.
Shredding increases the surface area that the compost microbes have to work on and provides a more even distribution of air and moisture among the materials. Since it's the brown materials that take the longest amount of time to break down, shredding them significantly reduces the finishing time of compost.
The type of chipper or shreddder used is not important, provided it can handle the materials. Rotary lawn mowers can also be used for dry leaves by running the mower back and forth over a pile a few times although this method is not as effective as using a commercial shredder. Some readers have recommended shredding dry leaves in the bottom of a plastic garbage bin with a rotary grass trimmer - we do not recommended this method due to the risk of injury. If you insist on giving it a try, be sure to wear both gloves and goggles!
Nitrogen rich materials such as manure, vegetable wastes and green prunings can also be shredded. Soft succulent materials do not need to be shredded because they break down very quickly in the compost pile.
If you don't have a chipper or shredder you can chop your materials into smaller pieces with pruning shears or strong scissors. We often do this with our tomato vines at the end of the season. It takes a fair amount of effort but the results are worth it.
6. Use a Compost Tumbler
Using a compost tumbler is one way to get finished compost in a short amount of time with minimal effort. Although most of us will not be able to make finished compost in two to three weeks as some manufacturers claim, there are significant advantages to using a tumbler.
The most significant benefit is the ease and convenience of turning the pile. Turning an established compost pile can be a lot of work, so much so that most people simply don't do it often enough. Compost tumblers do produce finished compost in a much shorter amount of time than most other methods. Compost tumblers tend to be more expensive than other bins and their capacity may be limiting to those with huge amounts of material but for most people it's the quickest and most effective method there is.
There are now a wide variety of quality compost tumblers available including:The Original Compost Tumbler
This tumbler has a large 18 bushel capacity and a gear driven drum for easy turning even when full. Internal mixing pins help push freshly added materials to the core where temperatures can reach 150+ degrees. Aerator/drainage devices on the door provide air intake without loss of compost (also prevents leaching of nutrients into ground below). Screened vents on end caps help to ensure a constant flow of fresh air into the bin (helping to prevent odors). View details on Amazon »RotoComposter Compost Tumbler
This tumbler has one large capacity compost drum that rotates on a stable base for quick and easy mixing. It comes fully assembled so there are no worries about putting it together. It's made from recycled plastic and holds 12 cubic feet of material. It has a 16 inch wide twist-on vented lid. View details on Amazon »Mantis ComposT-Twin Composting Bin
This 2-chamber rotating composter lets you "cook" one batch while you add new material to another. It's built with a sturdy tubular frame and has aerator vents. The easy-to-turn handle and gear system makes for easy mixing. This tumbler is a bit pricey but it's a solid work horse with a capacity of 10-bushels. View details on Amazon »7. The Secret Compost Ingredient: Alfalfa Meal
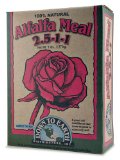
Adding an activator such as alfalfa meal to your compost provides the much needed nitrogen and protein that really speed up the process.
Activators are a source of both nitrogen and protein, ingredients that assist the organisms to break down the organic material. There are many commercially made activators that are worth a try. We have tried a few but nothing has come close the the results we have seen with what we call "our secret compost ingredient."
The activator that we call "our secret ingredient" is Alfalfa meal! In some areas you will find Alfalfa Meal
in garden centres and it is also available from online retailers. Wait unti you see what it does for your compost. The results are remarkable!
You can also use fresh manure, bone meal, blood meal, cottonseed meal, comfrey, or even high-protein dry dog food (yes, that's right, dog food!) as a compost activator.
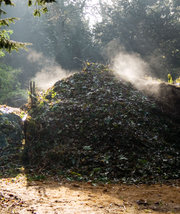
8. Use More Than One Pile
If you have a lot of material to compost it's a good idea to start a new pile rather than adding to an existing pile.
Once the composting process begins and the material in the pile starts to break down it is advisable to avoid adding new material unless there is an imbalance of greens to browns that should be corrected. Adding new material to an existing pile will usually prolong the wait for finished compost and, in an open pile, the longer the process takes the greater the risk that nutrients will be lost to leaching.
A better idea is to start a brand new pile with the fresh material. Both piles will be break down more efficiently and will be ready sooner!
9. Start a Worm Compost Bin for Food Scraps
Worm Composting, also known as vermiculture is an often overlooked composting method. It's not just for city folks anymore!
One advantage of worm composting is that it can be done indoors and outdoors, allowing for year round composting. It also provides those living in apartments with a means of composting. Worrm compost is made in a container filled with moistened bedding (often shredded newspaper, or shredded fall leaves and a handful of sand or soil) and red wrigglers (also known as branding or manure worms).
You add your food waste and the worms and micro-organisms will eventually convert the entire contents into rich compost. Worm compost bins are also a fun and eductational project for children!
10. Grow your own super-charged organic fertilizer
If you have a spare garden bed, consider growing a patch of comfrey. Comfrey has deep roots that absorb nutrients from the subsoil, which are then stored in the leaves. Comfrey leaves have a high level of nitrogen making them a great activator for compost piles but their real value is in making comfrey fertilizer for your plants. When you compare the nutrient levels of compost with comfrey fertilizer at the end of this article you'll see why we use the term "super-charged."
Growing Comfrey
Comfrey is a hardy plant that will regrow from small pieces of root so it is important to choose the site with care. Comfrey rarely sets seeds so it won't infest your garden. The plants will do well in full sun to near full shade in an area that gets lots of moisture. Space the plants 2 to 3 feet apart and stand back and watch it grow. In the first year cut the flower stalks and add them to the compost heap. In the second year you should be able to get 3-4 cuts from a single comfrey patch. Just take a pair of shears and cut them back to about six inches from ground level. Wear gloves because the leaves can irritate skin.
Making Comfrey Fertilizer
- Fill a barrel or plastic garbage can 1/4 full with comfrey leaves
- Weigh the leaves down with a stone or a brick
- Fill the container with water
- Put a lid on the container
- Let stand for 4 to 6 weeks. The mixture is ready when the leaves have rotted and are no longer visible.
- Your liquid feed is ready to use in your garden!
- If your comfrey plants have grown enough you can start a new batch
- Another method is to use comfrey leaves as above but without the addition of water. The result is a thick, black concentrate. This should be diluted at 15:1 before use.
Comparative Nutritional Analysis of comfrey, compost and manure
| MATERIAL | Water % | Nitrogen % | Phosphorus % | Potash % | C:N Ratio |
| Farm Yard Manure | 76.00 | 0.64 | 0.23 | 0.32 | 14:1 |
| Wilted Russian Comfrey | 75.00 | 0.74 | 0.24 | 1.19 | 9.8:1 |
| Indore Compost | 76.00 | 0.50 | 0.27 | 0.81 | 10:1 |