Compost Info Guide
Compost Tips, Composting Aritcles, Compost Bin reviews and much more...
Composting Articles:
- How to Compost
- Worm Compost
- 10 Tips for Better Compost
- Fast Compost
- Good Ingredients
- Green Materials
- Brown Materials
- What not to add
- Building a Pile
- Using Compost
- Measuring Moisture
- Compost Maturity
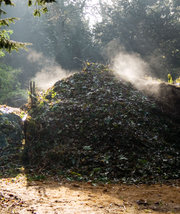
Making a Compost Pile
Making a compost pile is like making a giant layer cake! Well, not exactly but you will soon see what we mean.
But first, a few words about the amount of brown (carbon) material, versus green (nitrogen) material to put into your compost bin. Adding too much brown material will result in a pile that takes a long time to break down wheras too much green material will result in a slimy, smelly pile that doesn't heat up effectively. In order for our pile to break down quickly and efficiently we need to provide just the right balance of brown and green materials.
The microorganisms in our compost bins need both carbon and nitrogen to thrive; carbon for energy and nitrogen for protein synthesis. For every one unit of nitrogen used by the bacteria they also consume about 30 units of carbon. And so in order to keep the bacteria working efficiently we need to create an environment for them that is approximately 30 parts carbon to 1 part nitrogen.
Unfortunately, most composting materials don't have a carbon to nitrogen (C:N) ratio of 30:1. However, if we know the approximate C:N ratio of the materials we use in our compost, we can combine them so that the total mixture will be as near as possible to 30:1. This may sound a bit complicated but it really isn't.
Here's an example:
We want to have a ratio of 30:1 in our compost bin but we only have access to the following ingredients:
- dry autumn leaves (C:N of about 50:1)
- kitchen scraps (vegetable & fruit peelings, coffee grounds etc: about 12:1)
- grass clippings (about 20-30:1)
- sawdust (fresh: 500:1, rotted 200:1)
- leaves 50/1 + kitchen scraps 12/1 = 62/2 = 31/1 or 31:1
- 50/1 + 12/1 + 20/1 =82/3 = 27:1. Not too bad. In this example we can add some extra leaves or a handful or two of sawdust to bump up the ratio nearer to 30:1
For the carbon to nitrogen ratios of various materialsl, take a look at:
Brown Compost Materials
Green Compost Materials
Getting the mix of ingredients right is obviously not an exact science but a matter of trial and error. It's something that gets easier after a few tries. Now for the part about the Giant Layer Cake...
Making the Compost Pile
Start with a 4 inch layer of brush, twigs, hay or straw at the bottom of the compost bin. If you don't have these materials, dry leaves will do. This first layer should be as coarse as possible to allow air to be drawn up into the pile from the bottom of the bin.
Then add a 4 inch layer of brown material, then a thin covering of finished compost or good garden soil. That's one layer. The addition of compost or soil is to provide the necessary bacteria to get the compost to start breaking down. If we don't add this layer the compost will still work, the addition just helps to speed things along.
Then add a 4 inch layer of green material topped with a thin layer of an activator. Activators are a source of both nitrogen and protein, ingredients that assist the organisms to break down the material. There are a number of good activators. Alfalfa meal works amazingly well. You can also use fresh manure, bone meal, blood meal, cottonseed meal, or even high-protein dry dog food (yes, that's right, dog food!).
Continue adding materials in alternating layers of greens and browns until the compost bin is full.
Moisture
Moisten each layer by misting it lightly with a garden hose. The key is to moisten the pile without making it too wet and soggy. Many people recommend adding moisture until the material is as moist as a wrung out sponge. This is far too wet. If you can squeeze water out of it, it's far too wet. Adding some dry brown materials such as chopped leaves or hay will help if this happens.
If you live in a very arid climate, make an indentation in the top of the pile to collect rainwater and help keep the pile moist. Those living in rainy areas can cover the top of the pile with a tarpaulin or cover to keep it from becoming waterlogged.
More: Measuring Moisture Content »
Turning the Compost PileIf the pile has been made correctly the internal temperature should reach about 140° F within 7-10 days. Ideally, the pile should heat up to 160° F so that any weed seeds and pathogens will be destroyed. A compost thermometer is a helpful tool to use at this stage. Since the bacteria need air to survive they will start to die off after a week or so as they start to use up the available air in the pile. This drop in the amount of bacteria will result in the compost pile cooling off a bit from it's peak temperature. When this happens it's time to turn the pile to get more air into it.
When turning your compost pile, move the drier material from the outer edges into the center of the pile and break up any clumps of leaves or grass clippings to ensure that you get as much air into the pile as you can. Moisten any of the materials as you go, if they seem too dry.
From this point on you should turn the pile every 14 days or so, or when you see the temperature fall from the next peak in termperature of about 110° - 120° F. In general, the more you turn the pile the faster you will have finished compost. If you're using a plastic compost bin, an aerator tool will make the job of turning much easier. A garden fork is often the best tool for turning compost in an open style bin.
What should I do if I don't have enough materials to fill the compost bin all at once?When you can get your hands on some brown materials such as autumn leaves, save them in bags or a separate bin nearby your compost bin. When you have added enough green material to your compost bin to make a four inch layer, cover it with a 4 inch layer of the saved brown material. Then you can start building another green layer.
Next Page: Using Your Compost »